Capers are the exclamation point on a dish. The tiny buds of pickle-y brightness function as a kind of pick-me-up. All tomato sauces, and any risotto benefit from them, most pan sauces can use the kick, and no bagel and lox is street legal, in my opinion, without ‘em.
The bummer is, they’re not cheap. Particularly not at the speed I go through them. It’s why I wait all year for the nasturtiums to be at peak bloom, so I can harvest them to make nasturtium capers.
What are nasturtiums?
To quote my editor, “Nasta-what?”Arguably one of the world’s most persistent perennials, nasturtiums come in colors across the the red and gold band, and form bushy mounds of bright green leaves that look like lily pads, with flowers that look a little like columbines. They also come in trailing and climbing varieties. The flowers and the leaves are all edible, so you’ve likely seen them sold in stores or at farmers markets, or even eaten them. They have a spicy, peppery taste. People frequently plate cheese on top of nasturtium leaves.
Each and every nasturtium produces three seeds relatively quickly, and the plant is given to wild reseeding of itself, which is why most people only plant nasturtiums once, and wait for them to pop up everywhere each summer. As a side benefit, it’s considered a “trap plant,” in that it attracts aphids, which don’t harm the nasturtium; the plant acts like a spa for the aphids, keeping them off your other plants. If there is a garden nearby, that garden has nasturtiums in it.
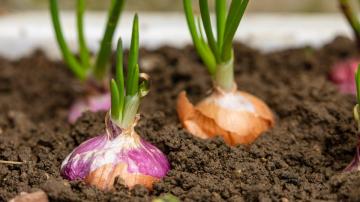
How to pick nasturtiums for pickling

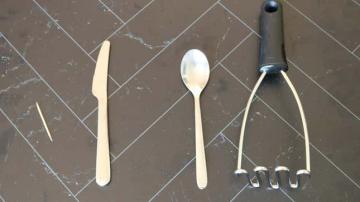
From left to right, the nasturtium bud, bloom, seed and leaf. The buds and seeds are what you want for pickling, ideally the closed buds.Photo: TunedIn by Westend61 (Shutterstock)
Frequently, I see people suggest picking the tender seeds of the nasturtium, before they get pale and woody. And yes, if you get to them early enough, they’re real treats that pop open in your mouth with a little crunch. But some years ago, I noticed that nasturtium buds actually have a texture that’s remarkably similar to real capers. Now I exclusively now pick those, instead of the seeds.
Get the equipment you need to make nasturtium capers:
For each plant, you really need to pop a squat next to it, and start working from the ends of the vines back to the root, plucking off the buds, and placing them in a jar next to you. Obviously, look for aphids or other pests, but for the most part, the buds, still shut, should be fine. You want to pick as many as you can, and it’s best to pick early or late in the day.
How to pickle nasturtiums
These buds are meant for what’s known as “hot packing.” Heat up the pickling solution, fill warm jars with the buds, then pour the solution over them. Put a lid on, and process as you would any pickle.
Ingredients:
¼ cup white wine vinegar1 cup of water1 teaspoon of pickling salt½-pint jar with lid2 cups of nasturtium seeds or budsIdeally, you time this to take place right at the end of a dishwasher cycle, so the jars that go through it will be clean and still hot. Rinse the seeds and buds well, and set aside. In a small saucepan, boil all the vinegar, water and salt.
Split the seeds and buds between the two jars, and pour the hot brine over them, leaving an inch of headspace at the top of each jar. Cover the jars with a new lid and band, and process in a water bath.
This means filling a pot big enough to hold the jars side by side, lining the bottom with a towel, and filling the pot with warm water. Now place the two jars in the pot, ensuring there’s enough water to cover the jars with an inch to spare, and bring the pot to a boil, covered, and allow the pot to boil for 10 minutes.
Turn the heat off, leave the pot where it is, and allow the water to come back to room temperature. Once the jars come out, assuming the tops are sealed, they are safe to go on a shelf, rather than the refrigerator, until you open them. Once opened, they should last a few weeks in the fridge.
The capers are ready to use a few weeks after you process them, and I think you’ll find them a hardy substitute for “real” capers, and one can never undersell the utility of being able to tell guests you grew the capers yourself.