Reducing food waste is an important issue that many people care about, but even the most combative eco-warrior would hesitate to chug a glass of past-its-prime milk. Would a large percentage of those naysayers eat a beautifully plated wedge of spoiled milk (cheese)? Absolutely, myself included.
In my home, we use cream or half & half in coffee, but milk, whole or otherwise, is strictly for recipes, and not something we typically keep on hand. This often leaves us with a sizable remnant of milk after the au gratin or mac and cheese has been eaten, and I hate to waste it.
Recook It
I’ll usually plan well ahead, and arm myself with enough recipes to use up the milk, but I like to keep homemade ricotta in my back pocket as a rescue remedy. Ricotta—Italian for “recooked”—is made from the whey produced while making pecorino or mozzarella. In many regions, it’s a sheep product, while in America it tends to be a cow creation.
A casaro (Italian cheesemaker) will re-cook previously separated whey until new curds form, then strain it into baskets to produce ricotta. While casari use whey, you can use the aging milk from your fridge, and you can do this with whole and 2% milk; anything lower won’t have enough fat to make curds.
A bit of lemon juice or vinegar, a strainer, and a cooking thermometer are the only things you really need, and we broke it down in this piece a few years back with more hands-on directions.
Making ricotta at home is very straightforward, and cooking kills any cooties someone like me lives in abject fear of, plus you get cheese. Bring the questionable milk to an almost boil, stir in an acid, strain, and enjoy.
Powdered lemon or citric acid also work here if you don’t want to add more liquid (some recipes call for up to ¼ cup of lemon juice). Just a scant teaspoon of powdered lemon is enough to get the same sour punch (and coagulating effects).
Use your finished product as a spread for toasts, whip it into scrambled eggs, or dollop onto pizzas and pastas. This version tastes livelier than the store-bought kind, which has a lot of creamy notes, but less zing than homemade versions.
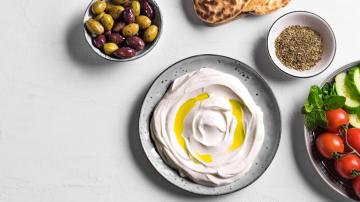
You can flavor ricotta with sugar, salt, olive oil, herbs or spices, spoon tapenade on top, or season with garlic and more lemon for a heavenly and light mezze addition.
Recook the already recooked
Despite my best intentions, I have, on occasion, wasted the very thing I made to prevent wasting, and homemade ricotta no exception. Store-bought ricotta is another creamy culprit of accidental excess; after making lasagna or baked ziti, the partially-used tub ends up withering in the back of my fridge.
While superb when freshly opened, ricotta really loses that freshness after three to four days, but you don’t have to chuck it.
Do as the (southern) Italians do, and recook the recooked thing: make Ricotta al Forno, “oven-baked ricotta.” Think of the yummy browned bits of ricotta you get on a white pie–that’s the delight that awaits you.
Usually served at breakfast time, these little cakes of cheese can be sweet or savory, but the base is a single ingredient dish, unless you customize. Sprinkle some olive oil, herbs, and seasonings on top before baking, or use as a vehicle for sweets. Just like unbaked ricotta, it’s really versatile.
While many bake it in a pile or small mold to create a mound, I like mine to have as much of the delicious, savory, almost-burnt crust as possible, so I spread it on the thin side, usually one inch-thick, before baking.
If making homemade ricotta is simple, ricotta al forno is even simpler: Arrange it in your chosen vessel, bake, cool, and serve. Cook until browned to use as a dip, or cook until crisp to serve like a pie or semi-firm cheese.
The temperature is up to you and your oven. For thicker versions with a dip-like quality, 400°F is fine to crust up the outside while leaving some moisture on the inside. To get a more cake-like consistency, 375°F is safer and will yield a smoother and chewier result.
I like to prepare mine in a cast iron pan. It maximizes the crispy bits, is heavy enough to get a crust going quickly, and because it takes a long time to cool, it moisturizes the crust so you can reheat it again without drying it out—it’s delightfully chewy on the inside with Maillard magic all over the outside.
Considering both of these tips are low-stakes, low-effort, and don’t involve a ton of additional ingredients, it’s easy to implement them as a practice when you’re using milk and ricotta, but you can also make (and/or bake) yogurt, cottage cheese, and other fresh cheeses like mascarpone, cream cheese, and more. Experiment to your heart’s content, but don’t throw out something that could be exceptional with a little bit of effort.