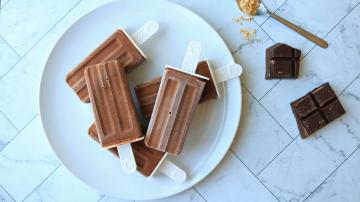
Marble cakes are as classic as hot fudge sundaes. They remind me of cute, energetic elderly folk chatting over tea and cake–even though I never see this, I’m sure they’re out there. It’s wholesome and comforting. But sometimes getting a good marble pattern in a loaf cake can be more elusive than the recipe suggests. With a mind to find the best tool for the job, I tested four implements to see which one would marble a chocolate and vanilla loaf cake the best.
What is a marble cake?
The name for this type of cake refers to the mesmerizing swirl pattern in a slab of marble. Usually two different flavors of batter with contrasting colors are gently mixed together to achieve this look, but you could add food coloring to portions of light colored batter if you wanted the same flavor throughout. You can marble a number of baked goods, like cheesecakes, brownies, or bundt cakes, but for the sake of testing I focused on the most snackable of casual cake shapes: the loaf. Its simple shape and size mean it’s easy to slice and store, making it, in my opinion, one of the most common cake shapes to whip up for casual eating.
What’s the trouble with marbling?
It sounds simple on paper–pour two batters together and mix them a little–but some marbles are better than others. Some recipes skip the swirl completely, instructing the baker to dollop a few scoops of vanilla into the pan, then scatter in some blobs of chocolate, and repeat until the pan is full. Then it’s off to the oven. When you slice the cake, the two colors create more of a cowhide pattern because the blobs often stay put.
Recipe instructions that include a swirl step indicate the tool you should use. The two most common in my experience have been a toothpick or a butter knife. The problem I see most often with these is that they don’t do enough. The toothpick is short and thin, and I suspected it would only swirl the top layer. The butter knife can reach the bottom of the pan, but I wondered if it was still too thin to drag the batter around sufficiently.

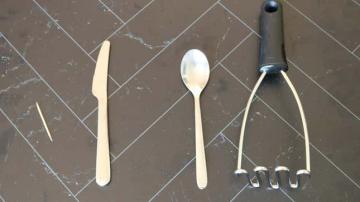
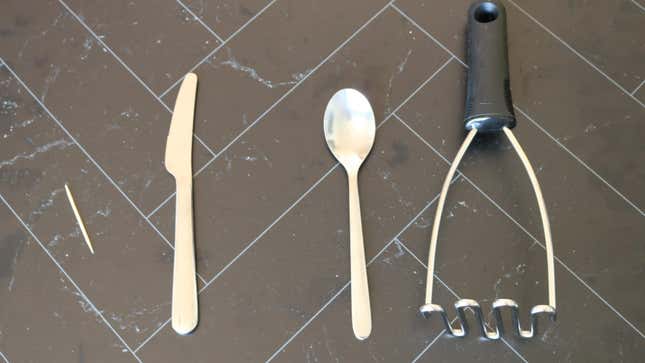
The toothpick and butter knife are typical tools for marbling, but the tablespoon and potato masher could upset the norms.Photo: Allie Chanthorn Reinmann
The tools I tested
I wanted to see a side by side comparison, so I made four loaf cakes, each swirled with a different tool. I used a toothpick, a butter knife, a tablespoon (the kind you eat with, not measure with), and a zig-zag wire potato masher. The tablespoon and potato masher were my idea. Even though I never see those mentioned as options in recipes, they’re common in most kitchens and seem like they’d be good for the job. For the sake of testing, I used the same brand of chocolate and vanilla boxed cake mix for all of the loaves.

From Left: Toothpick loaf, butter knife loaf, tablespoon loaf, and potato masher loaf.Photo: Allie Chanthorn Reinmann

The butt-ends of the loaves show distinctly different marbling results.Photo: Allie Chanthorn Reinmann
The best marbling results
The results were partially surprising, and I learned a bit about how I like my marble (more on that in the “Tips” section below). There are a few things to note. I alternated the vanilla and chocolate batter when I scooped them into the pan to start, which you can see in the picture. They are all half-vanilla and half-chocolate. In all pans, batter cooks on the outside first because it’s closer to the heat. The batter to rises on the sides first and curls over toward the center at the top until the center cooks through. From worst to best, here are the results.
The toothpick
Let’s put the toothpick method in the dirt. Toothpicks are trash unless you’re lightly feathering lines as a finishing technique on top of a dessert. It’s simply not long enough to swirl below the top inch of batter, and even if it’s a shallow cake, it’s not wide enough to pull that top inch anywhere. The toothpick just passes through.
You can see in the picture above, the loaf on the complete left has two distinct sections of chocolate and vanilla. The heel of the loaf, propped up on its side behind the cross-section, is barely marbled at all. That small amount of marbling that you see is owed only to how I alternated scoops of batter into the pan, and the natural pattern of the batter cooking on the edges first and rotating inward at the top, not the toothpick.

Before testing, I thought the zig-zag shape of the potato masher might be the ticket.Photo: Allie Chanthorn Reinmann
The potato masher
The next tool to throw out is the potato masher. I really had high hopes for this one because I figured it would be faster. A couple plunges and into the oven. The wire swirl should have been perfect. It should have changed marbling as we know it. But alas, it did too much. On the far right (in the picture of the side by side loaves), the masher was so effective at marbling that, along with the way I loaded the pan and the rise of the batter, most of the pattern got chopped up and muddled. I also noticed that when I was using the masher, I had little control over precision marbling. I couldn’t move the masher to get into the corners or sides, so the heel of the loaf is mostly unmarbled.
The butter knife
This method only gets the silver medal for me because of my preference and a small technical point, but it marbles effectively overall. The loaf on the middle-left shows sufficient marbling that has thick, distinct swirling sections. A point gets taken away for inconsistency from heel to center. The flat, straight shape of a butter knife makes it a little less intuitive to swirl the ends of the pan. You can see the heel of the loaf propped up in the back has more of that cowhide blobbiness where the knife didn’t drag batter.

The tablespoons shape and length are the best for moving batter from end to end.Photo: Allie Chanthorn Reinmann
The tablespoon
We have a winner. The marble pattern on the tablespoon loaf (middle-right) presents more swirls than the butter knife’s pattern, and they’re still distinct. It’s not chopped up like the potato masher’s pattern and not blobbed like the toothpick loaf. The gold medal is for the easy maneuverability of the spoon’s shape to swirl batter consistently in all parts of the loaf. The end of the loaf has as nice marbling as the center section. Plus, the bowl end of the spoon allows you to scoop upward if your batter is stacked horizontally instead of lined up side by side.
The best part is that this tool is accessible, unlike the toothpick (which I rarely have) and specific sort of potato masher. This marbling wonder comes in every set of silverware. The next time you marble a loaf, reach for your tablespoon.
Tips for marbling cakes
If you think your marbling always sucks, these tips can help.
Distribute the batters. Pour the two colors side-by-side, not one on top of the other. Since you’ll be marbling from side-to-side, you’ll have more thorough marbling. Or, use a big spoon to distribute the batters evenly in a random pattern. Then no matter what happens you’ll get some sort of marbling.Don’t over-marble. It’s tempting todrag the spoon through the mixture just one more time. Resist. There’s a point when you swirl too much, like the potato masher, where the marbling will disappear. In a loaf cake, just poke the spoon down into the batter and zig-zag to the other end once and leave it alone.If you can, use less of the dark batter. If you’re splitting a vanilla batter and adding food coloring, or using a different ingredient like a peanut butter swirl, use less of the swirl color. Light colored batter will take on the dark color, especially if you tend to over-swirl. Use a little less than half and the marbling will show nicely.